Another fond memory I have was entering our homemade crafts into small town county fairs. One year I proudly displayed 3 ribbons from a walking stick I had whittled with a carving knife and another ribbon for a portrait I drew of a man's face.
I am so grateful for those memories and experiences. I learned how to use the creativity God gave me to take a few raw materials and create something new and wonderful! I really want my children to grow up with similar experiences. Sewing, building, drawing, sculpting, painting, and creativity with crafts are such a great activities to do as a family and these are wonderful tools for teaching our children about their Creator who is the ultimate artist!
With all that in mind, and with the prodding of my husband, I decided to post about a weekly (or whenever I get around to posting it) craft.
I'll try to make them do-it-yourself posts, but I'm really bad about taking pictures and even worse - way worse - about following any kind of pattern, so I'm usually just winging it as I go. I usually just get an idea in my head or see something somewhere and decide that I can make it cheaper.
Just an FYI about me and crafts:
-I am not an expert.
-I hate following directions, patterns, etc.
-I usually wing things and fix it along the way. AKA very little measuring, ironing, or pinning done.
-I am not a perfectionist when I make things for myself/my family so I cut corners.
-I usually don't do things the right way, but stick to what I know and what works for me.
So if you are a perfectionist when it comes to following rules, directions, patterns then you will probably hate these posts. Sorry about that.
Even if it's not quite a tutorial I'll try to write a little blurb about how I made it and how it can be easily replicated. I try to stick with crafts that I can make during a nap or two, so they'll be fairly quick and easy to make.
So on that note, I'll start with the first craft.
Knotty Baby Hats
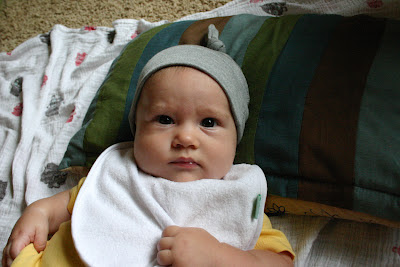
So easy. So cute. I thought it was ridiculous to spend $5-15 on a baby hat that could be whipped up in 3 minutes, so here's my version for you all.
What you'll need:
-Jersey knit fabric (or an old T-shirt)
-Sewing machine
-Thread
-Preferably a walking foot pedal for your sewing machine, but can be done without one
What I did:
Honestly, I just guesstimated the size of Declan's head, cut some fabric and sewed it up. Of course, it was too big so I had to fix it.
Is there a better way to do it? Yes.
Take a baby hat that you know fits your baby to use as a template (I didn't have one so I had to make a smaller one to use as a template). Fold your fabric in half, right sides together, making sure the stretch is going horizontally.

Lay your baby hat on top and cut around it but, adding about 3 inches in length to the sides, and add an additional little tuft on the top for the knot (see picture). I make my tuft about 2 1/2 inches wide and 5 inches tall.
 |
| Here's what it will look like after sewing around the edges. |
 |
| Make sure to line up the seams. |
 |
| Pin it in place so it doesn't move too much when sewing. |
 |
| Use a zig zag stitch to finish off the brim. (This is what it looked like on the outside after I flipped it right side out). |
Put on baby and kiss his or her cute cheeks!


 |
| Of course Em wanted to join in on the fun too! |


This is very good and looks cute when baby wear it. It also very simple to stitch
ReplyDeleteCosmetic Surgery India
Nice! Very simple, and very cute. I sew the same way you do, so these are totally my type of instructions. Thanks!
ReplyDeleteWow, you are my kind of sewing person, thanks for your blog!
ReplyDeleteKaren
Can't wait to make some for my new grandbaby coming in just a couple of weeks or so. Also, would make a great idea for making and donating to the hospital nursery. Thanks so much. Easy to do but would not have thought of it myself.
ReplyDeleteOoooo I can't wait to make some of these for my little sister on the way.. So simple and yet so cute! <3
ReplyDeleteSuper cute and easy to do! Thx for the post
ReplyDeleteNice blog
ReplyDeleteBest tummy tuck surgery clinic in Delhi.
Nice and useful blog. I am very impressed from your blog. Do you know about cosmetic surgery clinic in Delhi Dr. Ajaya Kashyap, MD FACS, is a Triple American Board certified surgeon in Delhi, India. Find out more about his cosmetic and plastic surgery on his website.
ReplyDelete